1417
The impact of B1+ on the optimisation of high-resolution ASL acquisitions at 7T1Department of Cognitive Neuroscience, Maastricht University, Maastricht, Netherlands, 2Centre for Functional and Metabolic Mapping, Western University, London, ON, Canada, 3University of Oxford, Oxford, United Kingdom, 4University of California, San Francisco, CA, United States, 5San Francisco Veteran Affairs Health Care System, San Francisco, CA, United States, 6Scannexus B.V., Maastricht, Netherlands, 7Advanced MRI Technologies, Sebastopol, CA, United States, 8Helen Wills Neuroscience Institute, University of California, Berkeley, CA, United States
Synopsis
In this 7T study, we examined potential causes of apparent absence of perfusion in the right inferior temporal lobe, by (i) assessing the B1+ distributions on two 1Tx/32Rx head-coils to rule out a hardware source, and (ii) optimising the spatial positioning of dielectric pads to achieve a more symmetric B1+ field. We observed that using an optimised dielectric pad positioning allows for a near whole-brain symmetric B1+, thereby, ensuring the adiabatic condition for the inversion pulse is fulfilled, resulting in the robust measurement of perfusion in the right temporal lobes.
Introduction
Perfusion-weighted imaging using arterial spin labelling (ASL) at ultra-high fields (UHF) is very attractive for research and clinical applications. Despite the advantages of increased image SNR (due to higher B0) and lengthening of T1 (longer post-labelling delays) compared to 3T, ASL at ultra high-field remains technically challenging. Our earlier work [1-2] has shown that optimisations to improve labelling efficiency such as tr-FOCI inversion pulses [3] and dielectric pads [4,5] can yield robust perfusion imaging using ASL at 7T. Dielectric pads offer the flexibility to locally improve B1+ field and pads of smaller area (13x13 vs. 18x18 cm2 in [1-2]) are often preferable to increase participant comfort owing to differences in head shapes and sizes. However, B0 and B1+ inhomogeneities can still cripple the spatial homogeneity and efficiency of the labelling (critical for perfusion imaging), thereby increasing the challenge of imaging the inferior aspects of the temporal lobes at 7T. Here, we investigate the causes of an apparent absence of perfusion in the right inferior temporal lobe when using the standard 1Tx/32Rx head-coil at 7T, and assess the effect of optimising the B1+ distribution using dielectric pads on the perfusion measured in the temporal lobes.Methods
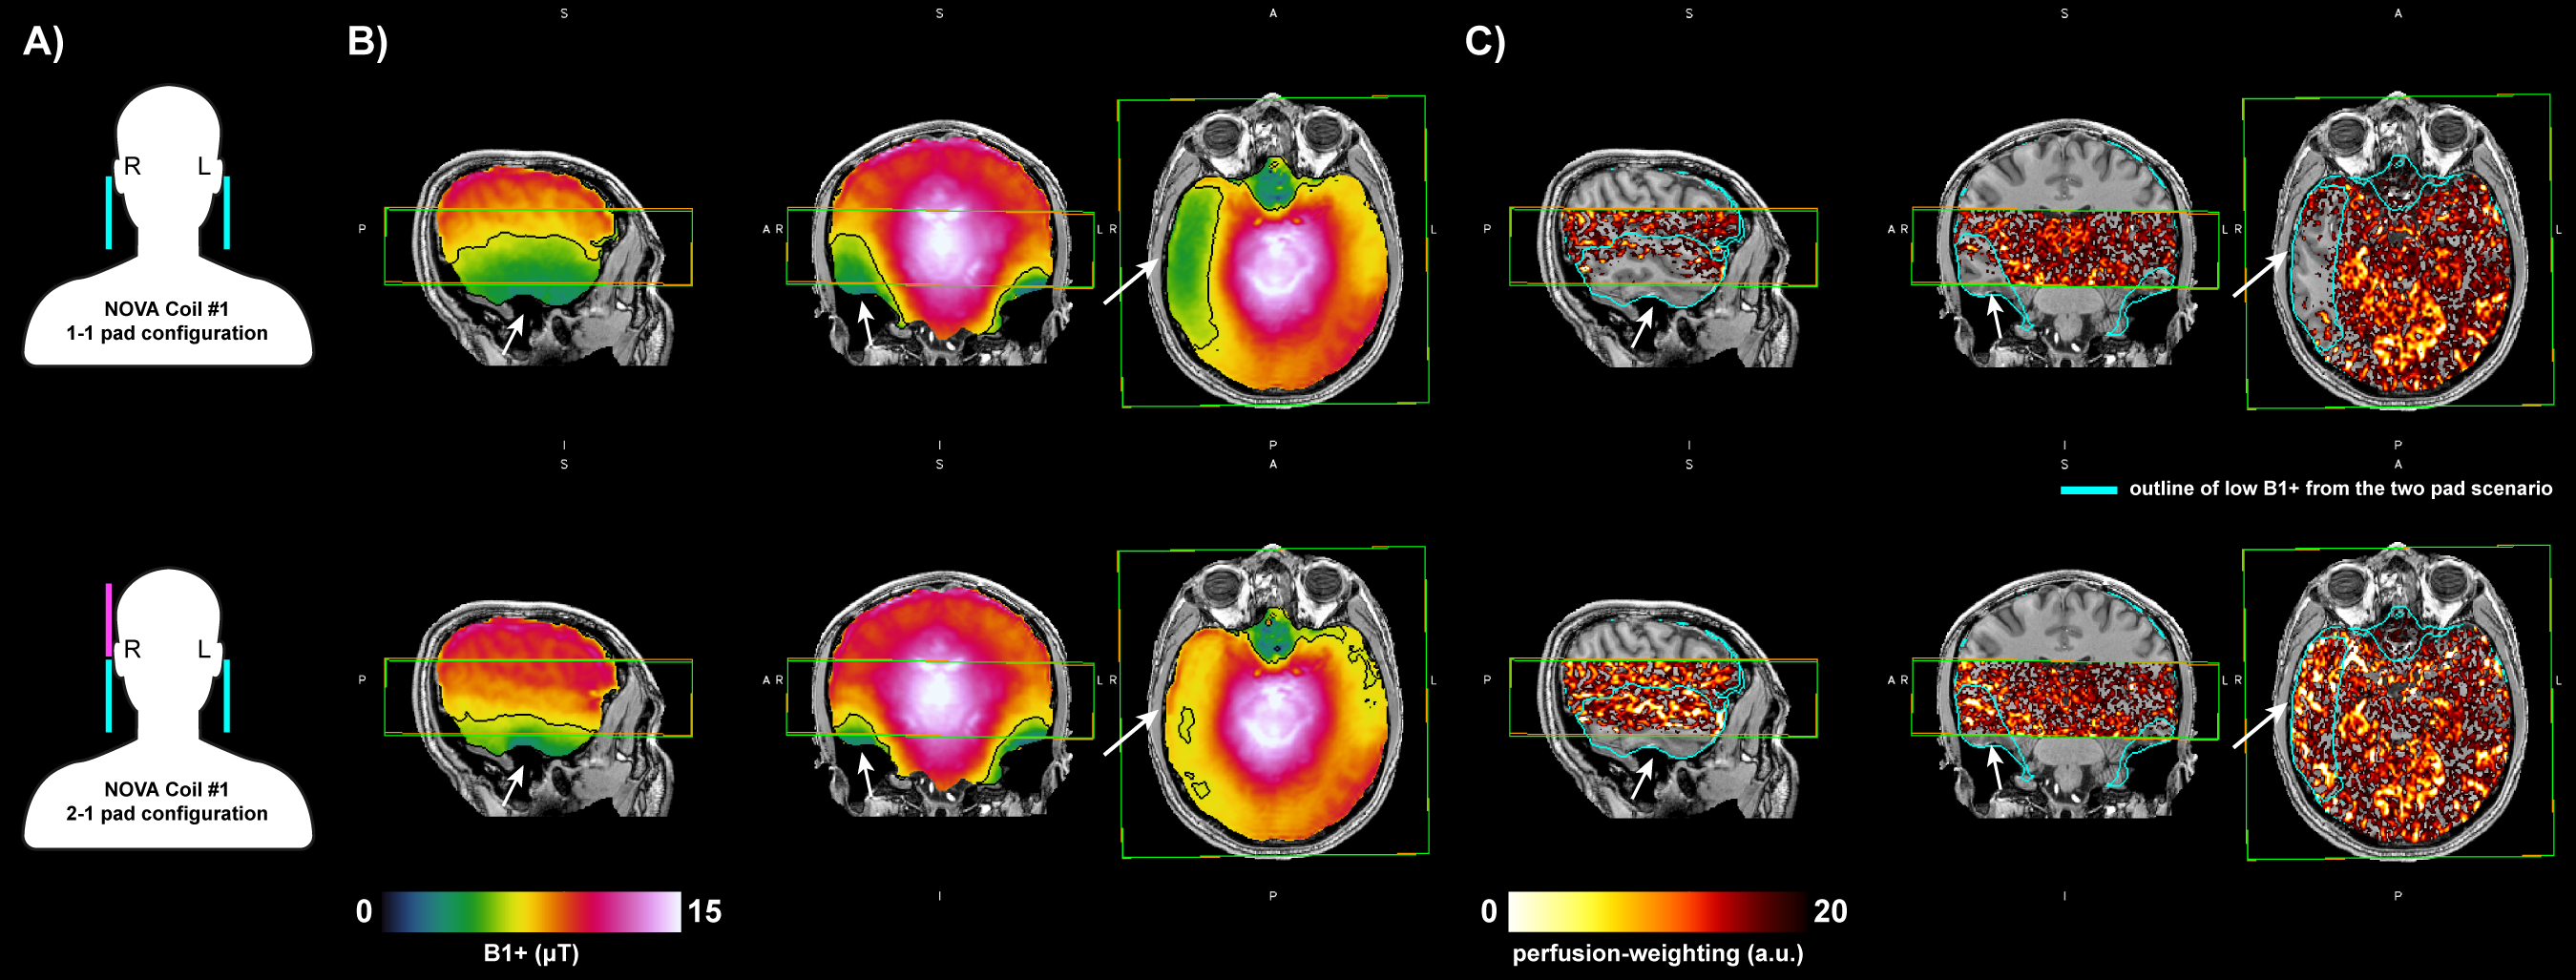
All data were acquired on 3 participants (34±2.5 years,1 female) on a Siemens Magnetom ‘Classic’ 7T using the 1Tx/32Rx NOVA head-coil. The experiments were approved by the local ethics and safety boards. Perfusion images were obtained using a 1.5 mm isotropic 2D-EPI PASL sequence with FAIR QUIPSS II labeling scheme [6] with TR/TE/TI1/TI2=2861/14/700/1800ms, 32 axial slices, matrix=128x128, echo-spacing=0.69 ms, Bw=1698Hz/px, PF=6/8, GRAPPA=3 (FLEET[7] reference lines=48), 200 paired repeats (tag-control interleaved), lasting ~9:30 min. B1+ maps were acquired using a 2mm isotropic Sa2RAGE [8] sequence with TR/TI1/TI2=2400/58/1800ms, α1/α2=4°/10°. A second 1Tx/32Rx NOVA head-coil was used to rule out hardware issues. B1+ optimisations were done with 13x13 cm2 Calcium titanate pads in: (a) 1-1 configuration: dielectric pads positioned on either side of the neck covering 13x13 cm2 each, and (b) 2-1 configuration: a third pad on the right hemisphere to extend coverage to 26x13 cm2.Results
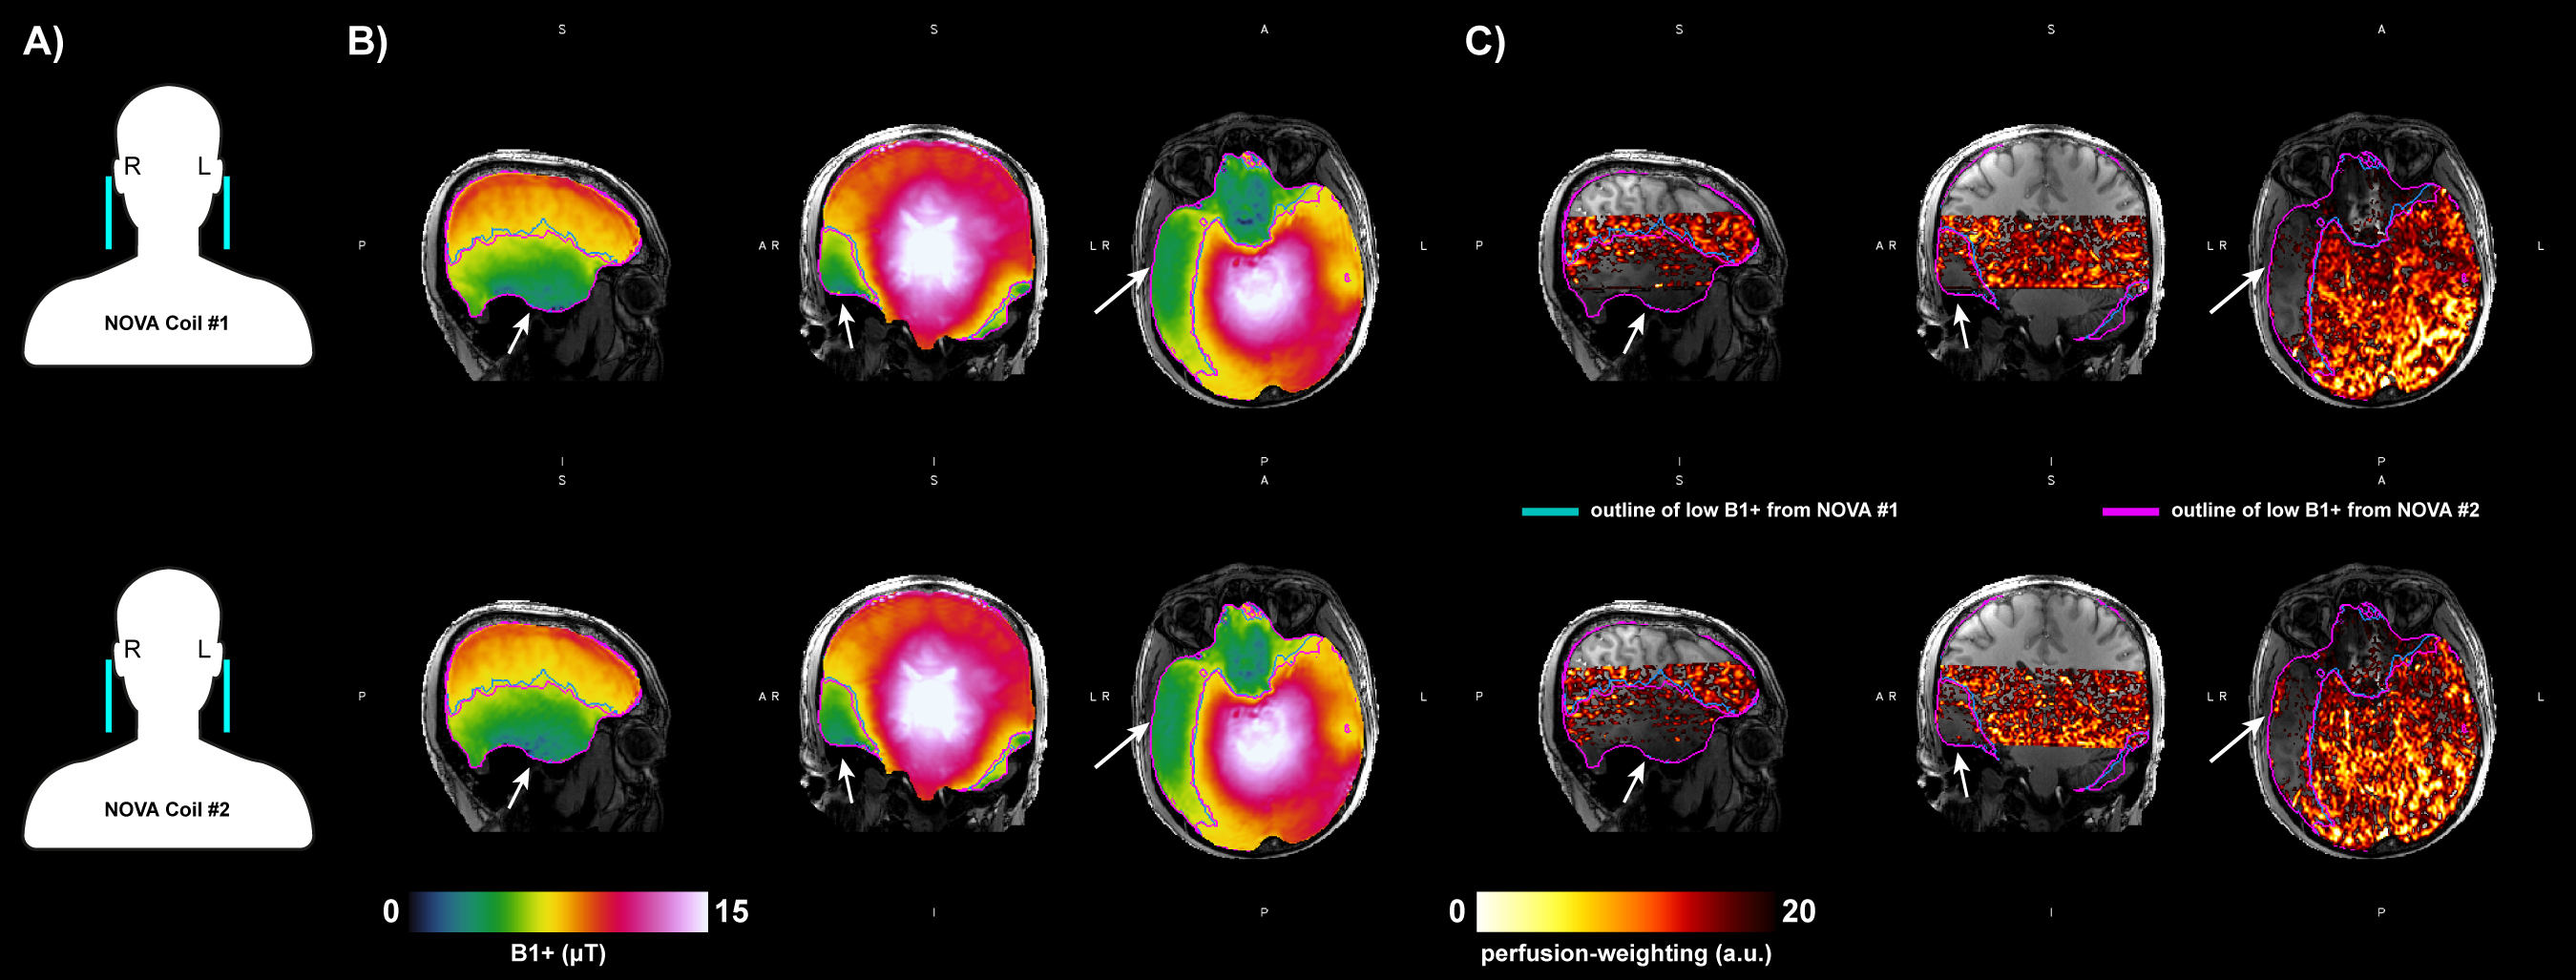
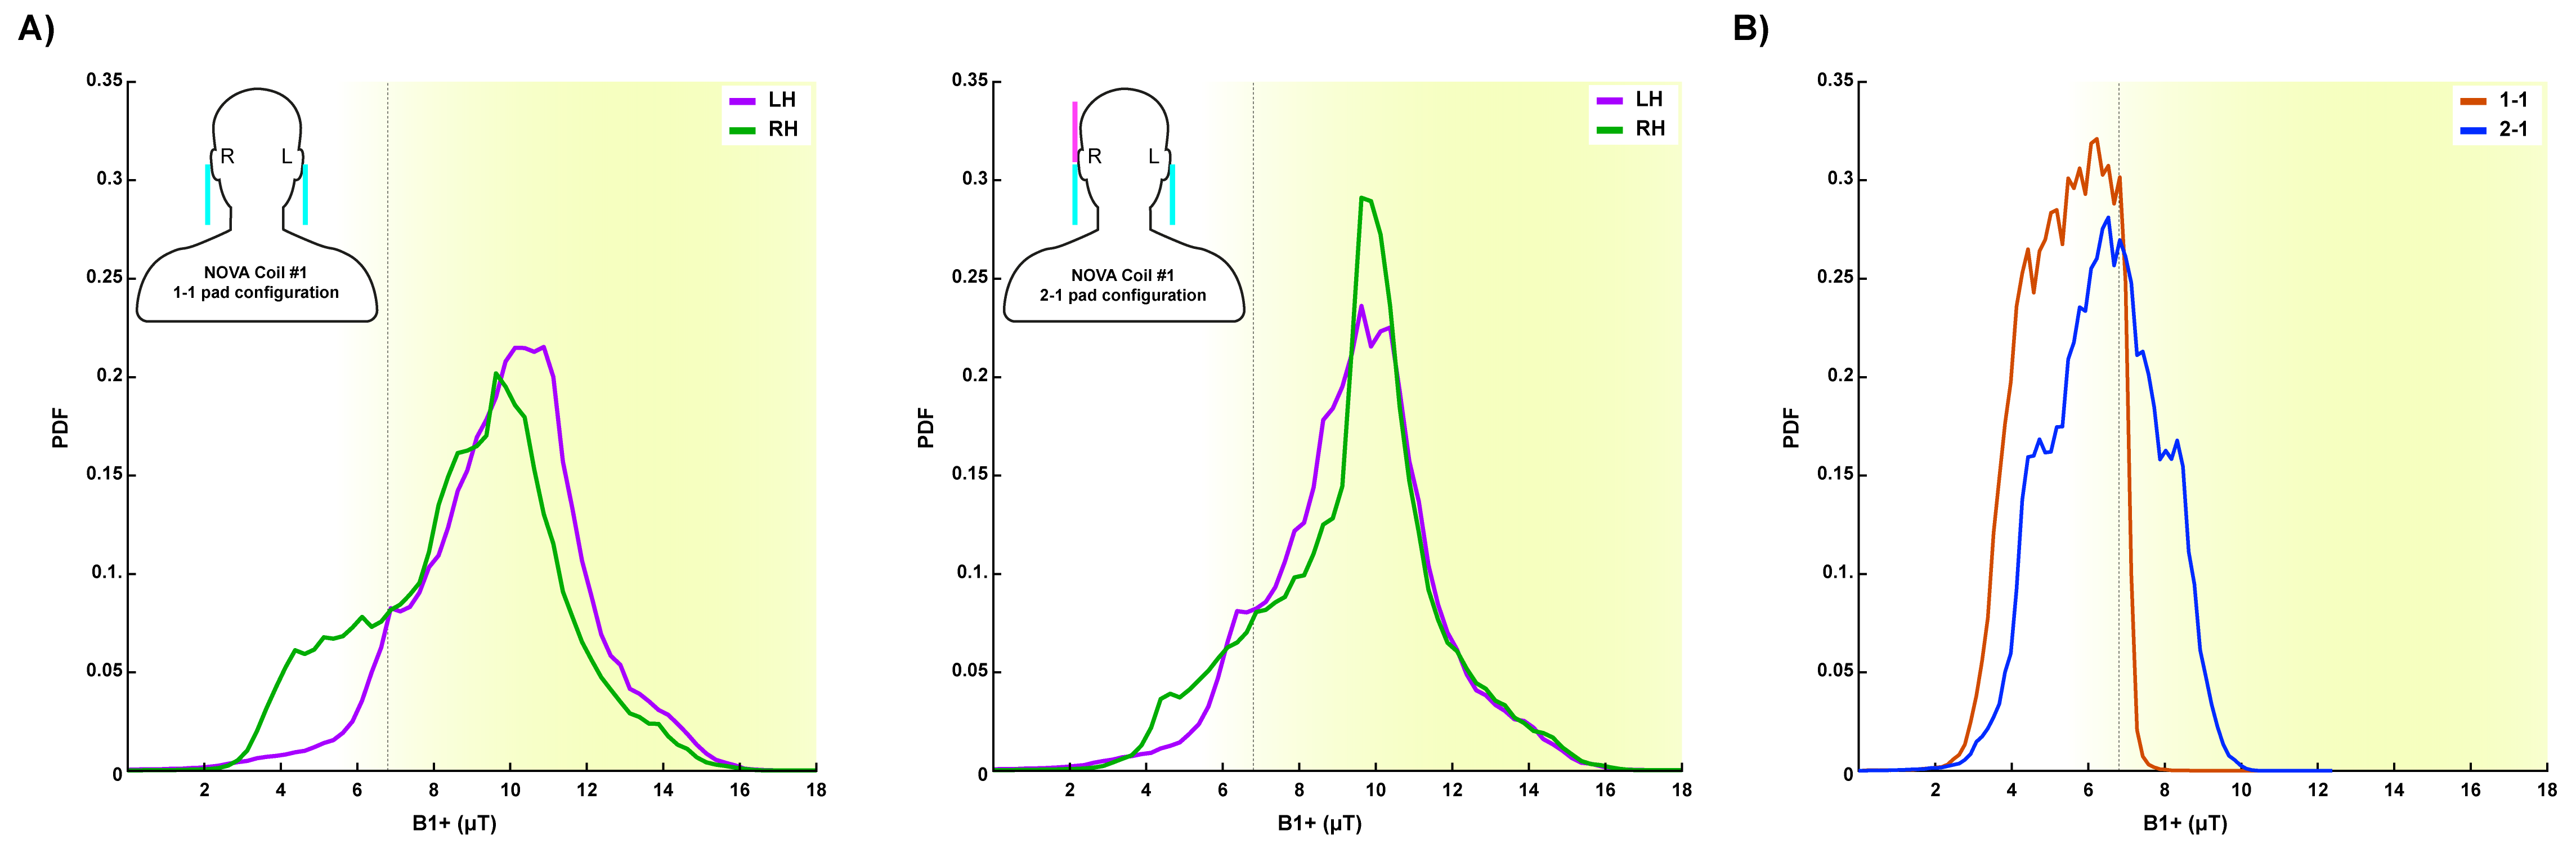
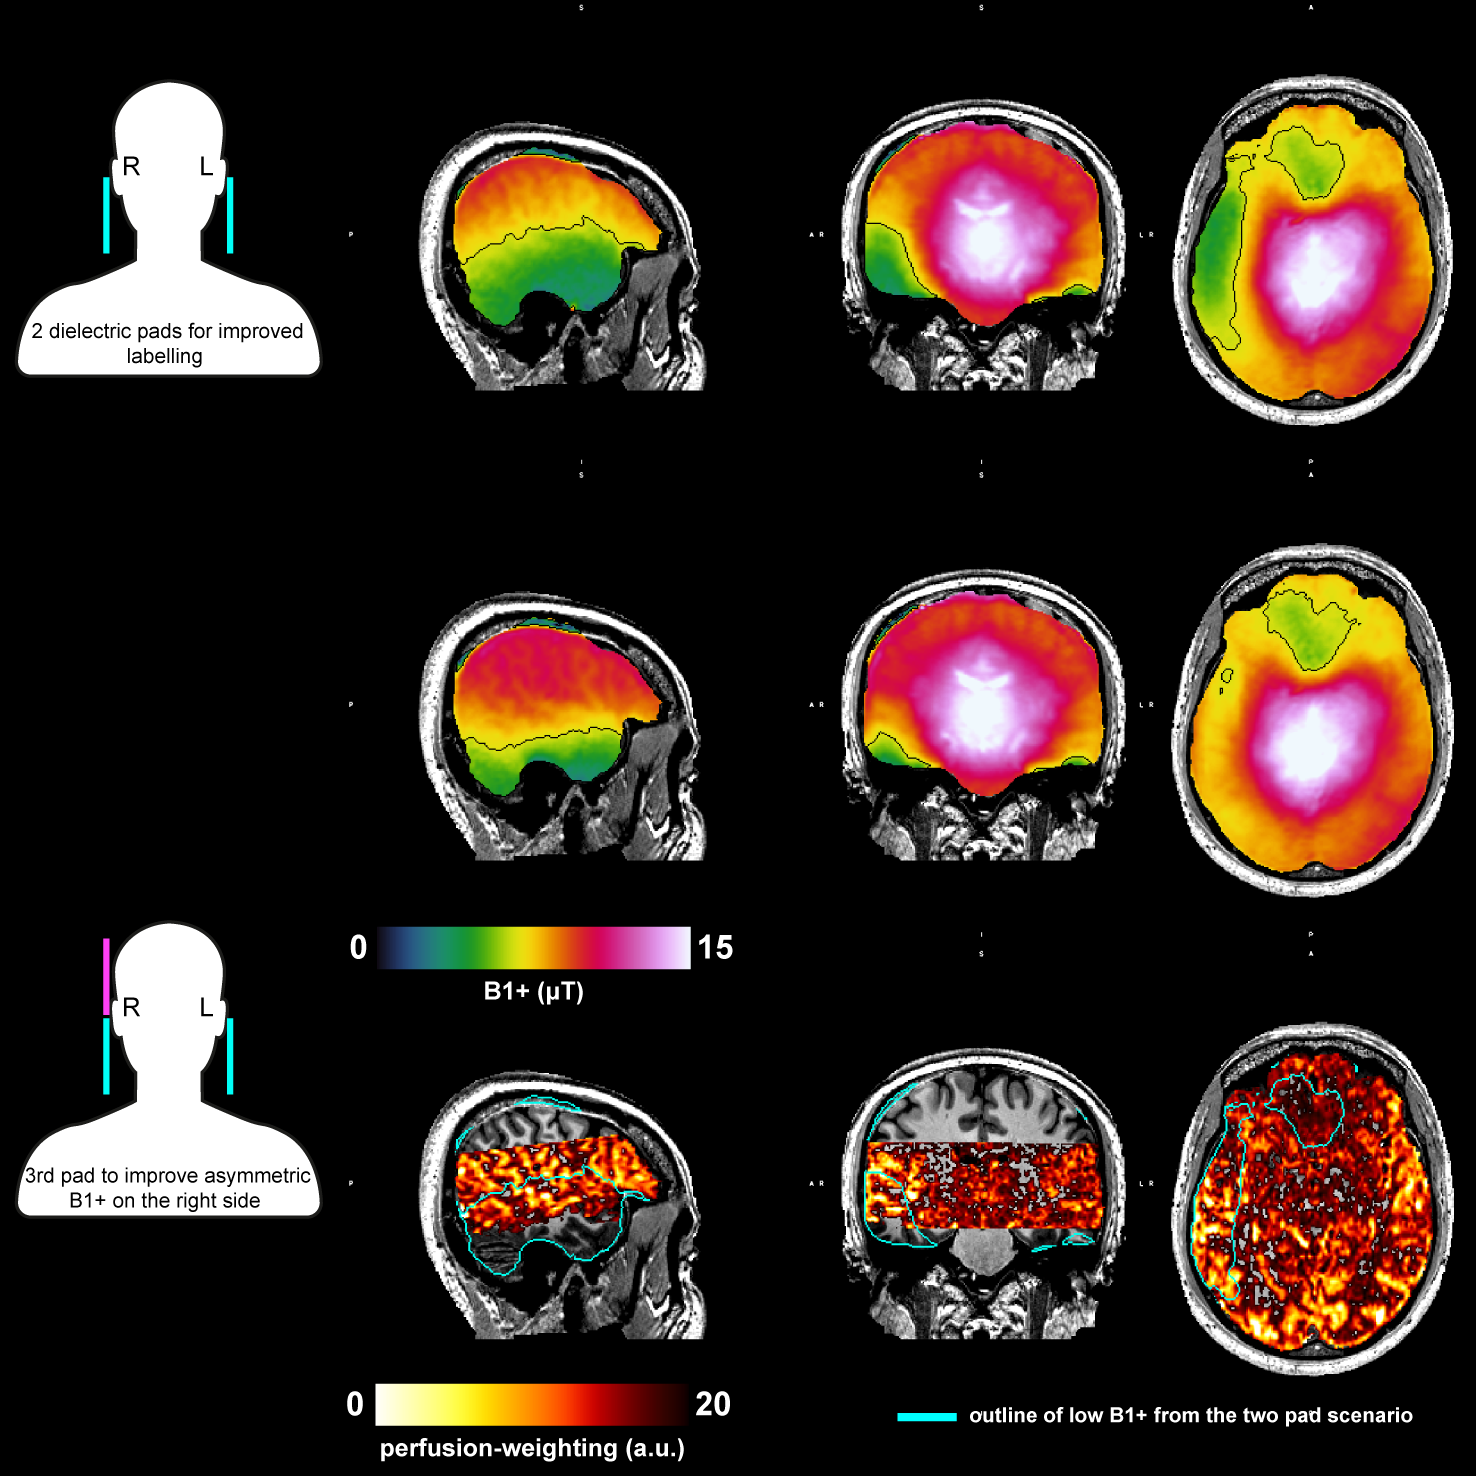
An example from the cohort in whom the apparent absence of perfusion in the right temporal lobe was observed is shown in Figure 1. The coil comparison was carried out using dielectric pads in 1-1 configuration (Fig2A) for improved labelling as is our typical protocol. While both head-coils have markedly consistent B1+ distributions (Fig2B) with a positive bias towards the left hemisphere, the low B1+ regions on the right hemisphere (indicated by outlines) are spatially overlapping with the regions of apparently absent perfusion (Fig2C). Due to the localised impact of the smaller dielectric pads, the 2-1 configuration (Fig3A, bottom) seems to improve B1+ homogeneity and results in complete recovery of the perfusion signal in the cortex where it was previously undetectable (Fig3C) in the 1-1 configuration (Fig3A, top). The B1+ histogram (Fig4A, green) shows that the right hemisphere has much lower B1+ compared to the left (Fig4A, purple). The improvement achieved by the 2-1 pad configuration is clearly demonstrated in Fig4C, by the shift of the 2-1 histogram (blue) towards higher B1+ values, thereby, increasing the number of voxels which meet the adiabatic condition of the inversion pulse. A replication of these findings in another participant can be seen in Figure 5.Discussion
Our comparison of two 1Tx/32Rx head-coils reveals a consistent positive bias of the B1+ distribution to the left hemisphere. Together with anecdotal evidence from other 7T sites, we concluded that the apparent absence of perfusion in the right inferior temporal lobe (Fig2) is unlikely due to a coil malfunction. Having ruled that out, we examined the B1+ distribution and optimised it using an additional dielectric pad (Fig3A). Employing three pads (2-1 configuration) resulted in the recovery of the perfusion signal in the region where it was previously absent. This was reproducible in another participant with different head shape/size. Consistent with expectations [5] we observe that the skewed B1+ can be limiting for perfusion imaging at 7T and urge caution for directly translating 3T acquisition protocols to 7T. Compared to our experience using larger pads [1-3], smaller pads allow flexibility to accommodate a wider cohort in a 2-1 configuration to achieve whole-brain B1+ homogeneity with a standard RF head-coil for robust, reliable perfusion imaging at 7T. While there has been recent progress on universal pulses [9] and parallel transmission techniques for optimising ASL [10], they come with their own challenges. Until these novel techniques reach maturity, dielectric pads are a promising alternative, especially for perfusion imaging of the temporal lobes, and other B1+-sensitive techniques such as diffusion MRI at 7T.Acknowledgements
Scanning was carried out at Scannexus B.V., Maastricht, The NetherlandsReferences
[1] Ivanov 2016 (10.1002/mrm.26351) [2] Ivanov 2017 (10.1016/j.neuroimage.2017.05.038) [3] Hurley 2010 (10.1002/mrm.22167) [4] Webb 2011 (10.1002/cmr.a.20219) [5] Teeuwisse 2010 (10.1002/ima.20218) [6] Wong 1998 (10.1002/mrm.1910390506) [7] Polimeni 2016 (10.1002/mrm.25628) [8] Eggenschwiler 2011 (10.1002/mrm.23145) [9] Gras 2017 (10.1002/mrm.26148) [10] Tong 2020 (10.1002/mrm.27944)
Figures